All you need to know about this GitHub repository
General rules
As an editor, try to work as much as possible on a different branch than the master branch. This can be on the elixir-europe infectious-diseases-toolkit repo or your own fork. Open a pull request (PR) if you want to merge your changes with the master branch. This way it is possible for other editors to give feedback on your changes. Typos or other small fixes can of course be done immediately on the master branch.
The google doc way of contributing
This process is sketched below.

Overview of the file structure in GitHub
The content of the website is built up using markdown files found in the root of the repository, spread in subdirectories according to the website section (attributing-credit, data-analysis, data-communication, data-description, …).
Markdown file naming
- Markdown files should be named without capitals and without spaces (replace them with hyphens).
- Make sure that the markdown file has a unique name.
- If the markdown file is named example.md, and located at in the
data-analysisdirectory, the page will be found at https://www.infectious-diseases-toolkit.org/data-analysis/example. - By default a page will not show up in the sidebar. In order to do so you will have to add the link towards the page to the
.yamlfile in the _data/sidebars directory or link towards it from another page. More info about this can be found on the find your page back section.
GitHub checks
With each PR or merge to the master, some checks are done using GitHub actions. One of them checks wether the website builds correctly. The other checks for changes in the tool/resource Excel table. When each of them fails, the PR will not be able to be merged. Click on the red dot/failed check to understand better what caused the fail.
Label, discuss and assign issues
- Check open issues regularly or enable notifications by clicking the “WATCH” icon in the top-right side of the GitHub repository.
- Assign labels to issues.
- Discuss who is going to be responsible for each issue with other editors and reviewers (via issue comments or other communication channels).
- Assign at least one editor/reviewer to the issue, who will discuss the possible content with the contributor.
- When a Pull Request (PR) or a draft PR related to an issue is created, link the PR to the issue.
More information about these topics can be found in the GitHub documentation:
Review pull requests
If contributors make a pull request to make changes, by default the editors that are responsible for files that will be changed by the PR will be assigned and notified. All PR should be assigned to one of the editors. Before merging a PR, tags for the page as well as the tools and resources should be checked and assigned according to the established tagging system. When approving a PR, the editor should also merge it.
Link a pull request to an issue
When you make a pull request resolving an issue, it is possible to link this pull request to that specific issue. This can be easily done by writing in the conversation of the PR: closes #number_of_issue, or fixes #number_of_issue or even resolves #number_of_issue. This is definitely applicable when authors first open an issue announcing a change or requesting a new page, followed up by the pull request.
For more information about this topic please visit the GitHub documentation page.
Adding a news item
Add a news item to the landing page by editing the news.yml in the _data directory in this repository. Use following attributes to define a news item:
- name: News title
  date: 2021-06-23
  linked_pr: 767
  description: A short description
All attributes are mandatory.
Create a new page
Simple way: using the GitHub interface
To generate a new page it is sufficient to simply copy the TEMPLATE file and rename it. To copy a template you have to:
-
Go to the
TEMPLATE_page.mdfile in the GitHub repo. - Click “Raw” on the GitHub page to open the file ‘as is’

-
Select and copy all the content.
- Go to the main section were you want to make the new page (attributing-credit, data-analysis, data-communication, data-description, …), in our example this will be in /showcase/. Click on
Add fileon the right followed up byCreate new file.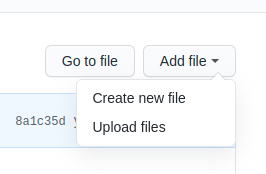
-
Paste the copied content from the template.
- Name the file by choosing a unique self explaining short name without capitals and without spaces (replace them with underscores).

- Check the frontmatter/metadata of the markdown page:
- delete
search_exclude: trueattribute. - add the author names to the contributors list.
- optional: change the title into an appropriate one.
- delete
- Describe shortly which changes you made in the description of your commit below the page. Commit to a new branch branch and click
Commit new file.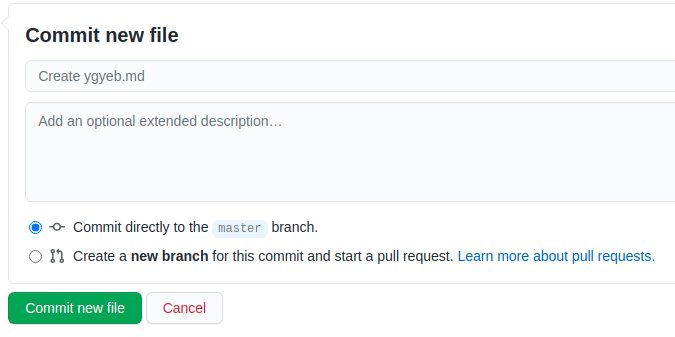
-
Wait till another editor approves your changes. After approval, the branch can be merged and changes will be applied.
- If the markdown file is named example.md and located in the subfolder website section
data-analysis, the page will be rendered at https://www.infectious-diseases-toolkit.org/data-analysis/example. This link can be provided to the contributor through the issue.
Advanced: working on your own feature branch and pushing local changes
Just like with every change you want to make to this repo, it is possible to do this through Git by working on a local copy. For more information on how to do this, please read our working with Git page.
Find your newly added page back on the website
By default your page will not be linked in the sidebar on the website, or on the landing page, but it will exist as an orphan at https://www.infectious-diseases-toolkit.org/section/markdown_file_name. In order to prevent that people will not find the page back it is better to link towards it in the sidebar or get linked within an existing page.
Linking pages in the sidebar and frontpage
Make sure all pages are accessible from the navigation sidebar. Please, avoid generating sub-pages that are not directly accessible from the navigation sidebar.
This website supports multiple sidebars. For example, the one in the main section of the website is different from the one in the contribute section. Both of them are defined by .yaml files in the _data/sidebars directory. Changing these yaml files will immediately impact the sidebars and the frontpage of the website. The sidebar supports multiple levels and each level in the hierarchy can contain a URL to a page within this website or an external URL.
The attributes that define the sidebar structure are:
title: This is the text that will show up in the sidebar.url: The URL to the internal page you want to link to. This is mostly in the form of: /section/markdown_file_name.html.external_url: Use this instead of URL if you want to link to an external page.subitems: to define a sublevel.
- title: Level_1_title
  url: level_1_url
  subitems:
    - title: Level_2_title
      url: level_2_url
Link page within existing page
Avoid manual linking to internal pages. If necessary, you can manually link to the pages like this:
If the markdown page is named example_1.md, you can link towards it using:
[Example 1](/section/example_1)
Adding extra info to the contributors
Do you want that the GitHub picture of a contributor is shown next to their name? Or maybe you want that the name is clickable and links towards the GitHub page of that person? To enable this please add the name and the necessary metadata to the CONTRIBUTORS.yaml file in the _data directory like this:
Bert Droesbeke:
    git: bedroesb
    email: bedro@psb.ugent.be
    orcid: 0000-0003-0522-5674
    role: editor
    affiliation: VIB-UGent
Adding an institution, infrastructure, project or funder
Institutions, projects, funders and infrastructures are listed in the affiliations.yml file. The information in this file is used on the support page in the about section (when expose: true), but also for the affiliations in showcase pages (listed in the metadata of the page with the affiliations attribute). Make sure you make use of the same name in those showcase pages. The yaml file has the following syntax:
- name: VIB
  image_url: /images/institutions/VIB-PSB.svg
  pid: https://ror.org/03xrhmk39
  expose: true
  type: institution
  url: https://www.psb.ugent.be/
name: nameimage_url: relative url towards the imagepid: url including the unique identifier towards the page of the association on RORexpose: true or false, when true this association will be shown in the about sectiontype: can be any of these values: institution, funder, infrastructure or projecturl: url towards the homepage of this association
The logos can be added to the logos directory.
Related pages
Add “Related pages” to a page
Infectious Diseases Toolkit pages from other sections can be displayed as “Related Infectious Diseases Toolkit pages” in a page, grouped by section.
An overview of all Infectious Diseases Toolkit pages and their page_id can be found in the List of page IDs page.
Example:
related_pages:
   showcase: [page_id1, page_id2]
Page ID
To find out what the page_id of an Infectious Diseases Toolkit page is, please check its metadata attribute page_id at the top of the markdown file or the List of page IDs page.